Creating Your Own Smart Outlets for Cheap
I've started to spend a little time learning about how to make my own basic electronic hardware as I delve into some simple home automation. One of the things that struck me, at least at the time of this writing, was that wifi outlets are still $25/each (which is cheaper than they were before, but in my opinion, still too expensive to be valuable).
A while ago I picked up Etekcity wireless outlets, which come with a remote controller and work on the RF frequency. I had intended to automate these, but recently I got a Google Home, which pushed me to take another shot.
Warning
There are plenty of risks when working with electricity. I am not responsible for fires, explosions, or electrocutions you may encounter while creating your circuit. My post is my personal learnings, which may be flawed, missing information, or non-reproducible. Be careful, and do so at your own risk.
The Parts
Hardware
- Etekcity Wireless Outlets: 5 pack ($25)
- 433 Mhz Rf Transmitter/Receiver ($6)
- Particle Photon $20
- Basic random parts (Breadboard, and some wires). I had one already, but you should be able to pick one up for $5-10 from Amazon
Total price: $55 (for 5 outlets)
I actually had a Spark Core, but the Photon is a newer version, and should work just fine.
Software
I was able to use Particle's Web-IDE on their website. I created a new program for my Particle, and added the RCSwitch library straight from their IDE.
You will also need the particle-cli. I used this for both first-time-setup, as well as connecting to the particle's serial device.
Security Notes
I feel obligated to at least leave a short note here: These RF lights work similar to an old garage door opener, meaning that anyone can listen for the codes, and turn on/off whatever you hook up the outlets to. Personally, if someone turns off a light that doesn't bother me much, but it's something to keep in mind before you hook it up to your TV.
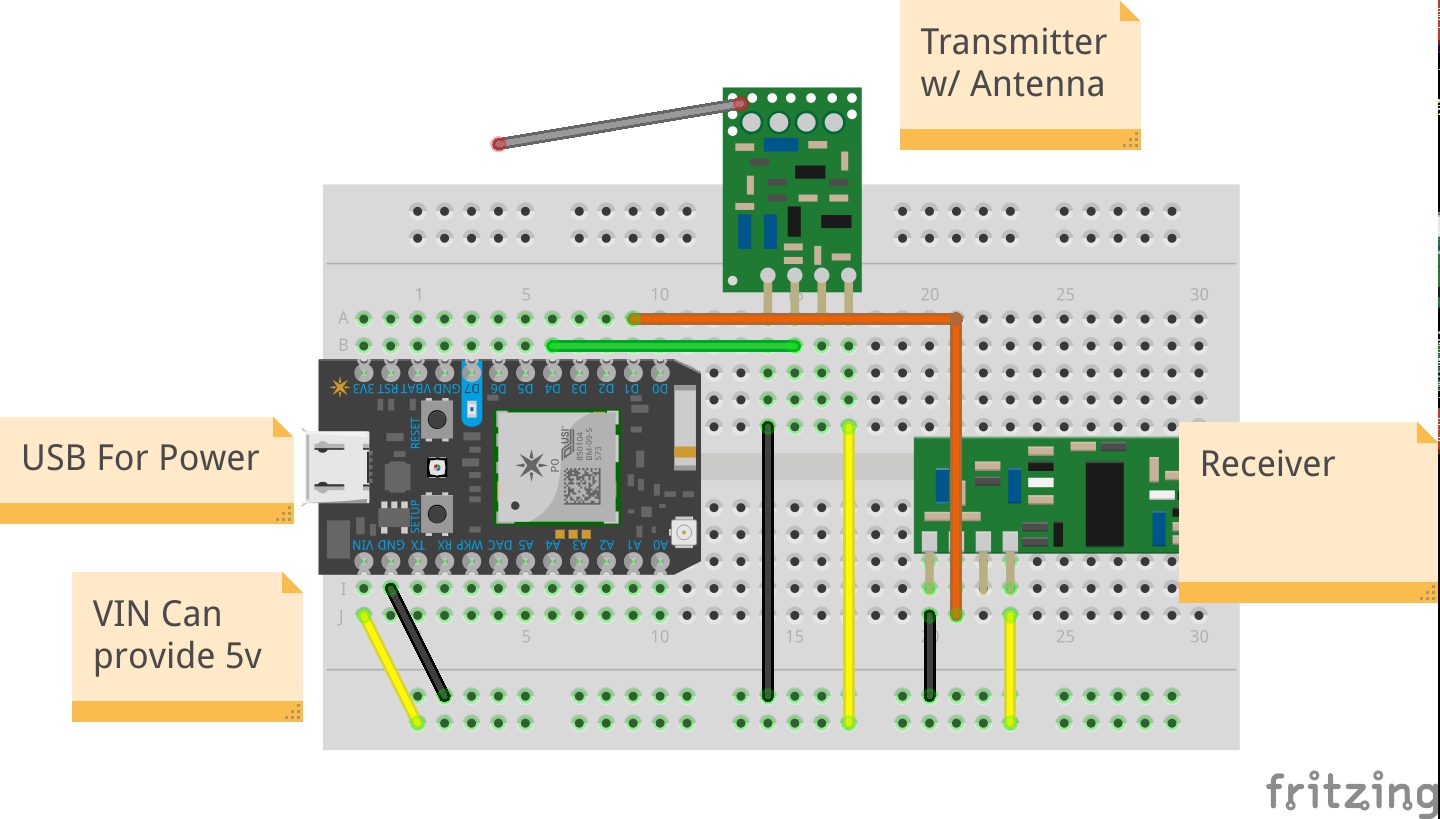
Hardware Circuit
Diagram
I used Fritzing to create the below sketch.
IMPORTANT: Please be careful to make sure you connect the right pins on your RF receiver to the right data pins. I made this diagram based on the parts available in the application, which may or may not match the parts you purchased (They don't match my parts below).
The important bits is to connect:
VCCtoVINpin on the particleGNDtoGND- Transmitter data pin to
D4(Or change the code) - Receiver data pin to
D1(Or change the code)
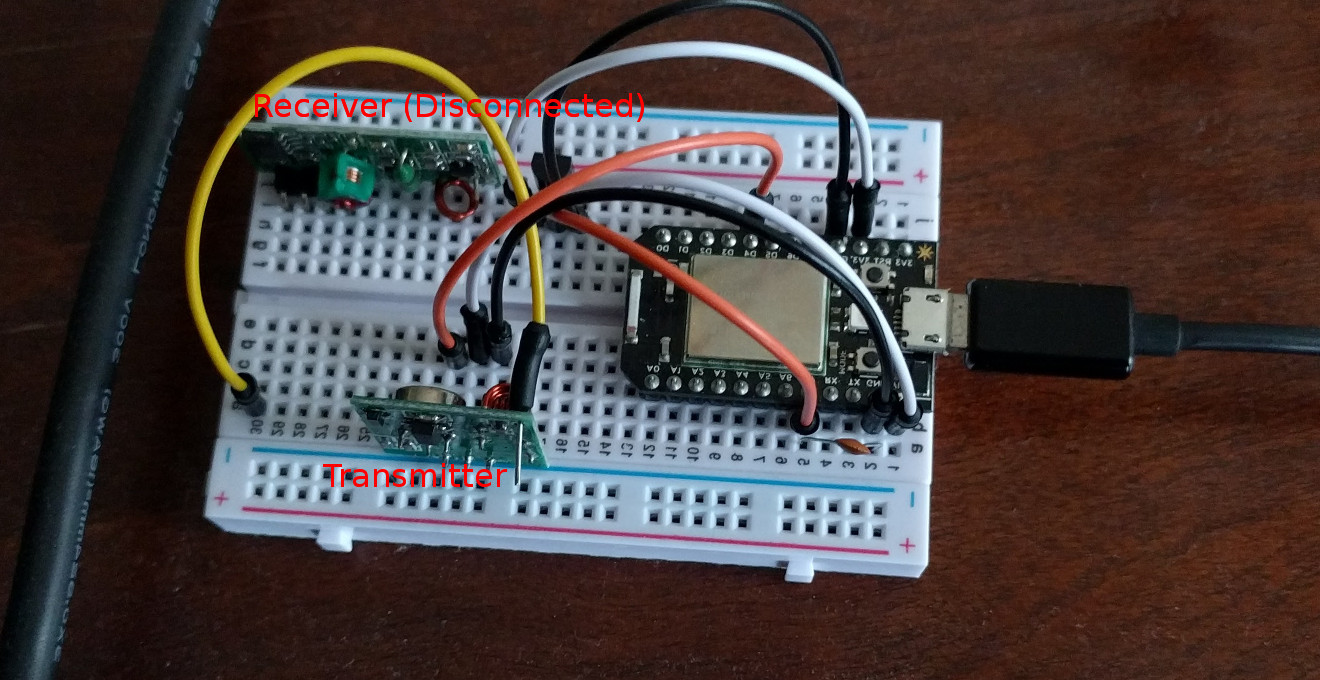
End-Result
The actual end-result. There's some extra wires on here because I also hooked up a temperature sensor:
The Code
Explanation
The code has a few different parts that you should pay attention to:
- Make sure
inputPinandtransmitPinare set according to how you attached the RF chips to your particle. - Uncomment
#define RECEIVERto allow receiving code to run, same withTRANSMITTER - You'll need to set up your
lightsvariable to be the name, the on-code, and the off-code. We'll cover this below.
Code
Difficulties
I ran into a few different problems, most of which I suspect is a result of using an older version of the Particle Photon:
- You need to enable interrupts by calling
interrupts()before setting up the RCSwitch Library - In the RCSwitch library, you always need to call
setPulseLengthaftersetProtocol, because the latter will override the former - I also updated the firmware of my spark core to 0.6.1, but again, I had old hardware
Setting it all up
Make sure to follow Particle's instructions for setting up your Photon with your account prior to these instructions.
Step 1: Capture RF Codes
The first step we'll need to do is capture the RF codes from our remote so we can add the codes to the configuration.
Steps:
- Uncomment
#define RECEIVERto enable receiver functionality - Plug in your particle to your computer, and publish the code to your particle
- From a terminal run
particle serial monitor. This will connect the terminal to your particle and output RF codes - Hold your remote near the device, and press the codes. Write down the RF codes and which button they map to
Step 2: Configure the code to use your RF Codes
After you have all the RF codes, all you need to do is set up the lights configuration variable in the code!
If you have a set of 3 lights, it should look like this:
const LIGHT* lights[] = {
    //lightDef("name", <on code>, <off code>),
    lightDef("light1", 267571, 267580),
    lightDef("light2", 267715, 267724),
    lightDef("light3", 268035, 268044)
};
Step 3: Try it out with particle's console
In the particle console you'll be able to see your device. There, you should be
able to call the function lights that the particle exposes. Here, you can specify it an argument, which will tell
the particle which RF codes to send.
It exposes a single function, where you can send an encoded string. The first character is a code, followed by light ids:
Code:
  a - activate
  d - deactivte
eg:
  a12 - activate lights 1 and 2
  d1 - deactivate light 1
  a1d23 - activate light 1, and deactivate 2 and 3
  aall/dall - activate/deactivate all
  alight1 - activate light with name "light1"
  dbed - deactivate light named "bed"

Step 4: Set up with website, or voice assistant
Of course, this is optional, but it's also fun! I used IFTTT, which turned out to be very convenient because it has direct integration to the Particle! This allows me to hook up its app, or Google Assistant, very easily to call the exposed function on the particle.
You can do all sorts of things with IFTTT, from emails, to calls, to location tracking (eg, automatically turn on all your lights when you arrive home).
Particle also has their cloud API which allows you to call functions on your particle easily by calling their API. I've written some custom mobile UIs using this API.
Conclusion
This was a fun experience for me, but it also took much longer to figure out than I care to admit. Hopefully this article helps you in your own home automation projects!