There are tons of articles out there on the great wide internet that talk about how to scale your application with Docker. Many of these articles talk about small docker environments, or quickly jump into how to massively scale it (With k8s, swarm, or otherwise).
But what about me? I want to host something for my personal sites and projects without investing the time and energy into a full blown cluster. Today, I'll be sharing my experience with managing a small docker swarm.
This article assumes that you're already familiar with docker and how to create a dockerized application, and thus skips much of that. If you're not already familiar with Docker, I suggest their getting started page.
Simply Docker
One of the easiest ways you can get going is to spin up a virtual machine (locally or on the cloud) and install docker on it. That doesn't handle key authentication for you, and certainly doesn't allow you to scale horizontally without repeating yourself and managing it manually, but it is an easy way to get started.
Personally, besides when I was learning, I skipped right over this.
Docker Swarm
If you don't know about docker swarm yet, I recommend it. Docker swarm gives you the power of hosting horizontally scaling services, without the need to worry about the networking that connects the containers. I find it to be a lot lighter weight than setting up k8s (or otherwise), but gives you scaling power. This is what I'll be focusing on.
My goal was to set up a small swarm that I could scale, but have minimal management overhead around security, and the ingress point.
Setting up a small swarm
Prerequisites
- Docker (Not technically required, but will definitely help)
- docker-machine To manage your virtual machines
Provision your hosts
Okay, first thing's first... you'll need some machines. I'm personally a fan of Ramnode, but any provider that works with docker would be fine (DigitalOcean, vultr, etc). Make sure you buy one of their KVM instances (you need to be running your own kernel to support docker).
If you're not ready to make the leap, you can spin up a few linux instances locally via Virtualbox (I'll show you how below).
Installing docker
Once you've spun up 1 or more instances, you'll need to set them up with docker-machine, which you'll need to install locally.
On already existing machines (Cloud)
To connect docker-machine to your cloud instances via SSH, run the following on each machine:
ssh-copy-id root@x.x.x.x # Make sure you have a local ssh key with ssh-keygen
docker-machine create \
  --driver generic \
  --generic-ip-address=x.x.x.x \
  --generic-ssh-key $HOME/.ssh/id_rsa \
  --tls-san mydomain.example.com \
  <NAME>
For the sake of this example, I will have two nodes. The manager called manager0 and a worker called worker0.
Locally (eg. Virtualbox)
If you're using virtualbox, first, make sure you have it installed.
Then, spin up at least two virtualbox instances with docker-machine. One will be the swarm manager, the other the worker node.
docker-machine create --driver virtualbox manager0
docker-machine create --driver virtualbox worker0
Connecting the swarm
Once you have docker set up and managed by docker-machine, you'll need to put them in swarm-mode.
On your manager node only, do the following:
docker-machine ssh manager0
docker swarm init --advertise-addr <MANAGER-IP>
This command will output another command to be run on each worker. If for some reason you didn't save it, you can get it again by running docker swarm join-token.
On each worker node, do the following:
docker-machine ssh worker0
docker swarm join ... # Insert join as returned by manager
Installing common services
Congrats, you have a small swarm cluster! It doesn't do much by itself, so it's time to install some services.
For the rest of these steps, we'll want to make sure your local docker command is pointing to the manager. We can run the following set that up:
eval $(docker-machine env manager0)
docker ps # Make sure it works
If you don't see an error, you're good to go!
Registry & Reverse Proxy
The two fundamental services we'll need for hosting websites on your swarm are the docker registry, and a reverse proxy to serve the sites with a domain name. I use traefik.
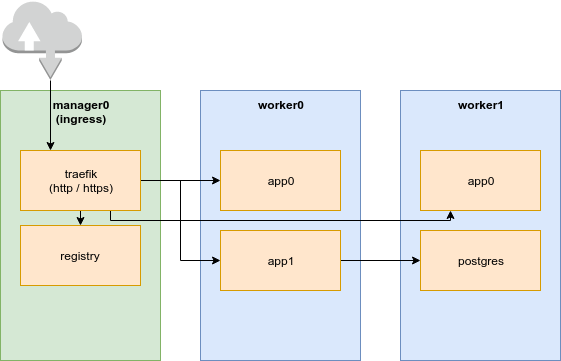
The below configuration accomplishes the following:
- Create an instance of traefik on the manager node
- Traefik will encrypt all traffic, and act as an authenticator for internal resources
- Spin up a registry on the manager to store docker images
- Put a UI and proxy infront of the registry for easy and secure access
NOTE: My yaml stack is parameterized, so make sure to set parameters when running it. You should be able to run it directly as follows (assuming you copy-paste it to common.yaml). It also assumes you have a wildcard domain pointed to your swarm. Eg, for zdyn.net, *.swarm.zdyn.net will point to the manager node.
export HOST=example.com
export EMAIL=myemail@example.com # Used for ACME SSL certificate
export GLOBAL_HTPASSWD=test:$apr1$eY3VB2rE$LOR9fJ5q5dHyzt4DYSVoQ/ #htpasswd entry for registry and traefik (this example uses test/test)

docker stack deploy --compose-file common.yaml common
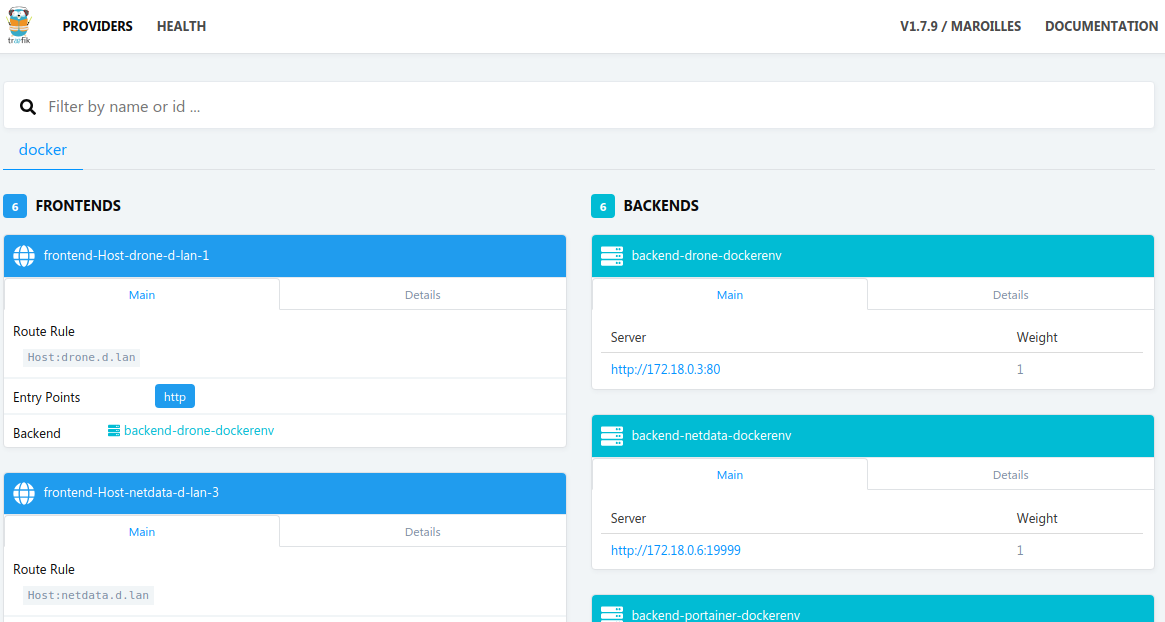
Once you deploy, you'll be able to access the following (Replace with your domain):
- https://traefik.example.com
- https://registry.example.com
Here's my common stack:
version: "3.3"
services:
# Reverse proxy with SSL encryption from LetsEncrypt (ACME)
traefik:
image: traefik:v1.7
command: |
--web
--docker
--docker.swarmmode
--docker.domain=${HOST}
--docker.watch
--docker.exposedByDefault=false
--logLevel=INFO
--entryPoints="Name:http Address::80 Redirect.EntryPoint:https"
--entryPoints="Name:https Address::443 TLS"
--defaultentrypoints=http,https
--acme
--acme.email=${EMAIL}
--acme.storage="/etc/traefik/acme/acme.json"
--acme.entryPoint=https
--acme.httpChallenge.entryPoint=http
--acme.onhostrule=true
--acme.acmeLogging=true
networks:
- traefik-net
ports:
- "80:80"
- "443:443"
volumes:
- /var/run/docker.sock:/var/run/docker.sock
- /dev/null:/traefik.toml
- acme:/etc/traefik/acme
deploy:
mode: global
placement:
constraints: [node.role==manager]
update_config:
parallelism: 1
delay: 10s
restart_policy:
condition: on-failure
labels:
- "traefik.enable=true"
- "traefik.docker.network=common_traefik-net"
- "traefik.port=8080"
- "traefik.frontend.rule=Host:traefik.${HOST}"
- "traefik.frontend.auth.basic.users=${GLOBAL_HTPASSWD}"
# This registry is ONLY on the local net
# and will be fronted by the registryui
registry:
restart: always
image: registry:2
environment:
# You should probably make something else to put here...
REGISTRY_HTTP_SECRET: oijh0923u4io32j4oi21h4h124012h4o1u2h41basdf
volumes:
- regdata:/var/lib/registry
deploy:
replicas: 1
placement:
constraints: [node.role==manager]
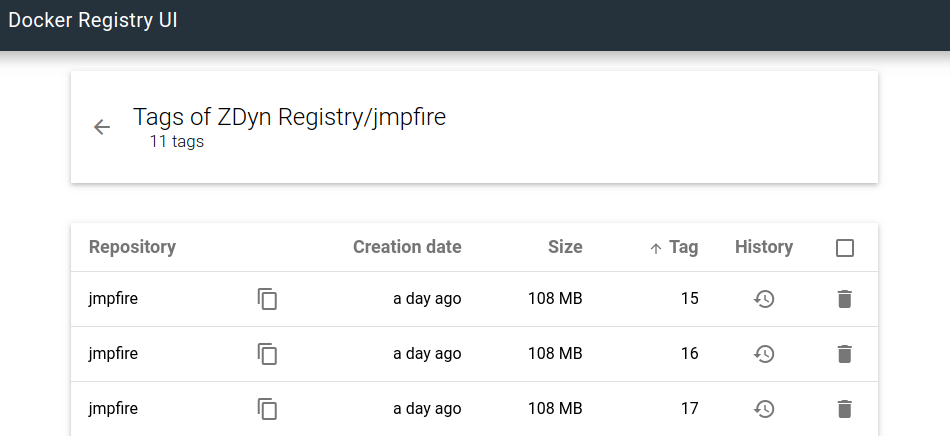
# UI to sit infront of the registry, acting both as a proxy to it, and a UI for it
registryui:
image: joxit/docker-registry-ui:static
networks:
- default
- traefik-net
environment:
REGISTRY_TITLE: 'ZDyn Registry'
DELETE_IMAGES: 'true'
REGISTRY_URL: http://registry:5000
deploy:
placement:
constraints: [node.role==manager]
labels:
- "traefik.enable=true"
- "traefik.port=80"
- "traefik.frontend.rule=Host:registry.${HOST}"
- "traefik.docker.network=common_traefik-net"
- "traefik.frontend.auth.basic.users=${GLOBAL_HTPASSWD}"
networks:
traefik-net:
driver: overlay
volumes:
regdata:
acme:
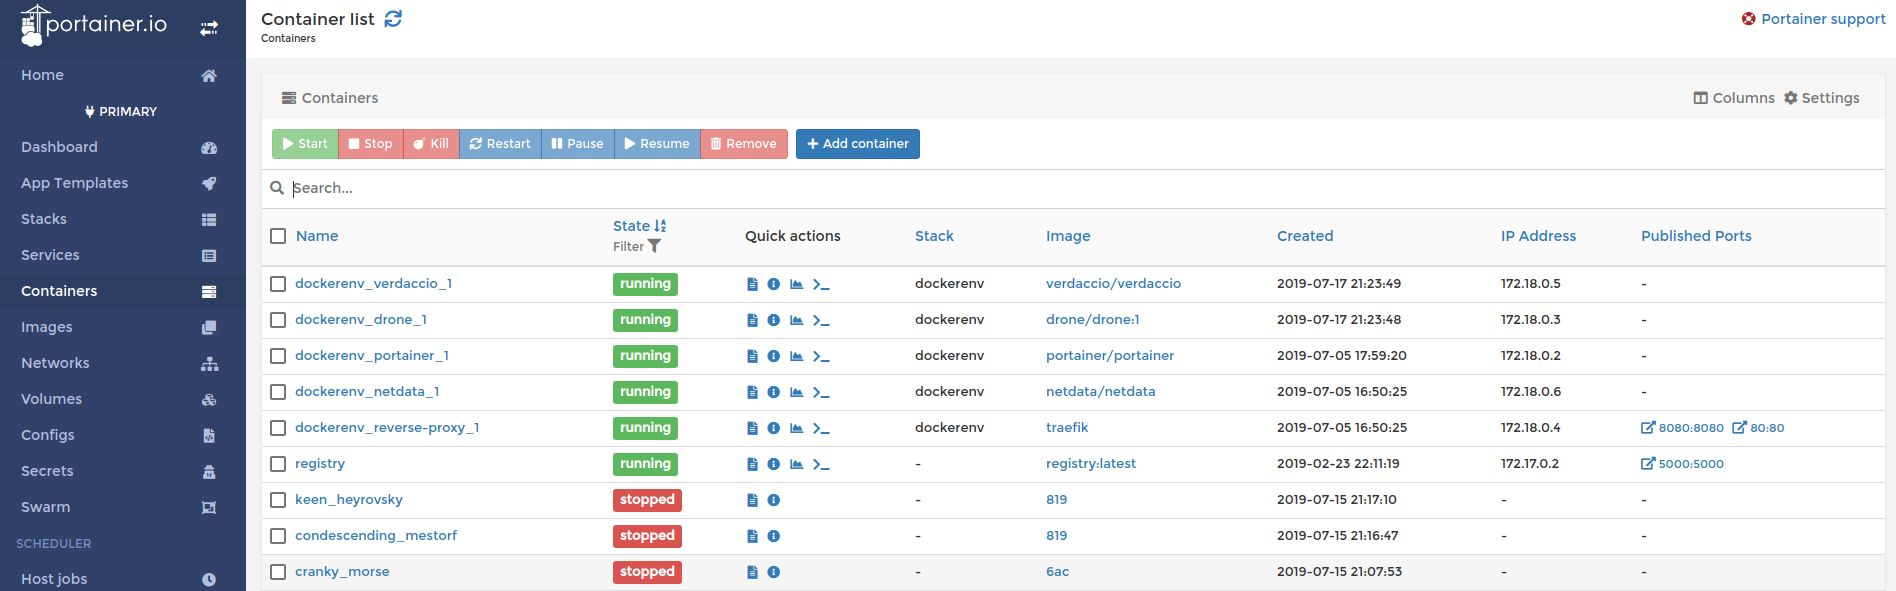
Managing the Swarm with Portainer (Optional)
I also run an instance of portainer on my swarm, which gives me a UI view of what is running where. This is also a good example about how to spin up a separate stack and have it communicate with the network on the common stack to gain the advantage of the ingress point (traefik).
Similarly to above, this one is also parameterized:
export HOST=example.com

docker stack deploy --compose-file portainer.yaml portainer
Once installed, go to https://portainer.example.com, and set up your admin account.
version: '3.3'

services:
  agent:
    image: portainer/agent
    environment:
      AGENT_CLUSTER_ADDR: tasks.agent
    volumes:
      - /var/run/docker.sock:/var/run/docker.sock
      - /var/lib/docker/volumes:/var/lib/docker/volumes
    networks:
      - agent-network
    deploy:
      mode: global
      placement:
        constraints:
          - node.platform.os == linux

  portainer:
    image: portainer/portainer
    command: -H tcp://tasks.agent:9001 --tlsskipverify
    volumes:
      - portainer-data:/data
    networks:
      - agent-network
      - traefik-net
    deploy:
      placement:
        constraints:
          - node.role == manager
      labels:
        - traefik.frontend.rule=Host:portainer.${HOST}
        - traefik.enable=true
        - traefik.port=9000
        - traefik.docker.network=common_traefik-net

networks:
  agent-network:
    attachable: true
  traefik-net:
    external:
      name: 'common_traefik-net'

volumes:
  portainer-data:
Deploying an application
Once you have the common infrastructure set up, you'll probably want to deploy an application of your own.
I won't cover how to make a Dockerfile here, for this case, let's assume you have one called blog by running docker build -t blog .
Pushing the image to your registry
First thing is first, we need to push it to your registry. You are more than welcome to push to dockerhub, but we set up our own to keep it private.
docker login registry.example.com # Prompt for username/pass.  Unless you changed it it should be test/test
docker tag blog registry.example.com/blog:latest
docker push registry.example.com/blog
Great! Now it should be on the registry, which you can check by opening up the UI.
Now it's time to make your stack and connect it to traefik.
version: '3.3'
services:
  blog:
    image: registry.example.com/blog:latest
    networks:
      - traefik-net
    deploy:
      labels:
        - "traefik.enable=true"
        - "traefik.port=80"
        - "traefik.frontend.rule=Host:blog.example.com"

networks:
  traefik-net:
    external:
      name: 'common_traefik-net'
And we'll deploy it like we did the other ones:
# You might have to login to docker registry again, depending on where you run this
docker stack deploy --compose-file blog.yaml blog
That's it! Now you'll be able to get to https://blog.example.com
If you want your blog behind a better domain, you can simply change the host rule in the config. Make sure your domain points to the swam manager node.
Remarks
Security
One of the things you might notice is that, unlike a traditional setup, none of the stacks expose anything on any ports besides traefik. This is because we all use internal overlay networking to expose services via traefik. We do this for two reasons.
- We want traefik to manage SSL and our host domain redirect for us
- We don't want to expose many of our services directly to the internet (databases, registry, etc..)
Vulnerability management
We don't talk in this article much about keeping things up to date. The private overlay network (and its encryption) protect us to an extent, but docker explicitely says we shouldn't rely on containerization as a security method.
It's on you to make sure to patch docker, ssh, and any other services in a timely manner.
Final Thoughts
I ultimately did this for a few reasons.. I wanted to be scalable, but also, it's just fun to play with docker. This blog, amongst other sites I run, are on this swarm now, and I'm able to quickly deploy and iterate on them in a way that is consistent and repeatable.
In a future post, I will be sure to talk about my CI/CD setup, where I recently switched away from Jenkins to Drone CI
If you have any questions, feel free to leave them below and I'll do my best to answer.
More
You can read more on the docker series here